This kiln is not so big that it take months to fill and so we can have more firings a year, anyway thats the plan.
I do worry about the speed of the flame due to the height of the chimney but we will work on that after we do a test fire.
I started preparing the side in April, above picture
 Photo 1
 photo 2 (20 May 2010)
Been on Holiday for 3 weeks since my return I have finished cutting the side and boxed the area. The boxing is mainly to keep the drainage gravel in place. There will be weedmat on the soil then drainage gravel. After laying the base brick I will remove the timber outlay and dig he trenches on each side to assist in the rain water runoff. The base it self is nearly level about a few centimeters drop on the end (firebox side)
21 May 2010,
Some rain today, managed to lay the weedmat and gravel base.
Started to lay the first bricks and hopefully I would not have to lift them to many times lol.
-->

23 May 2010
Still very wet but managed to finish the first layer of bricks.
Also filled the drains with gravel.

Before laying the next layer I am thinking of putting a thin layer of clay mixed with vermiculite this will improve insulation and also fix minor leveling problems.
24 May 2010Made up mixeture of clay and vermiculite and started the secon layer of brick ( Corooy white's)

As you can see the mixture is minimal between the brick aslo used to fill up the spaces between the bricks.
This my first kiln so all is trial and error. I will pour more gravel to keep the bottom layers of bricks in place, as they will not have to be moved anymore.
Hopefully the ground will dry out a bit so I can use the tracktor to bring in the gravel.
28 May 2010
Still more rain yesterday, had dryspells today so was able to finsh the base and with a bit of luck be able to lay some more bricks tommorow and be able to outlay the firebox and chimney. The space in between should be the main chamber.


29 May 2010
Managed to start on the chimney base, may have to make some larger slabs to cover the ports into the chimney but I will work on that in the morning.
30 May 2010
Loveley day sunshine and some wind so hopefully thing will start to dry out, Today I did cast the base of the chimney this should be dry by the moning.
Also made a start on the fire box, as soon as that is finished I can start making the formwork for the roof of the chamber.


31 May 2010
One other month gone by, tommorow the start of winter.
Today fitted the castable slab I made yesterday, on the chimney also fitted the damper.
Fixed the drainage pipe I dug up previously and start laying more gravel. The ground is slowly drying up so I can bring the gravel in with the tractor.


The nice fit is now a bit of a problem as it pinches the damper!!


03 Jun 2010
Started to make some minor changes today. Moved the damper from the side to the back to ensure that heat build up is even accross the kiln.
Moving in the back wall in one brick, this will make the chamber a little smaller but I think I can live with that.
04 Jun 2010
Picked up the steel today for braching the kiln.
07 / 09 Jun 2010
This week I have been working on the trailer getting it ready for our next trip in Jul.
10 Jun 2010
Last night I cast the grill for the firebox from duracast, hopefully I can get out the spacers I used to create the sturcture.
redone some of the chimney base, anyway here are some new pictures.


Tommorow I will start on the form work for the roof of the chamber.

13 Jun 2010
Finished support for the chimney, we will erect those tommorow.
I cast a fire grit out of duracast, the misstake I made was to use bricks for the openings and had some problem getting them out and this created some minor cracks, I made a metal cradle for the grid to sit in.


As additional support I put above this structure some metal angle to support the larger and heavy logs. If anyone know if this would create a problem please let me know.
Note: The fire grit I had to redo after the first fire, the metal did not last either, the new grit I did in side the kiln and coolite as spacers ( a bit of fuel took care of the coolite, I know not very environment friendly)
19 Jun 2010
Here are some more pictures from the last few days.

Chimney is getting higher, soon will have to incorperate the steel corners.

Chimney with angle irons and support braching leading to starpickets
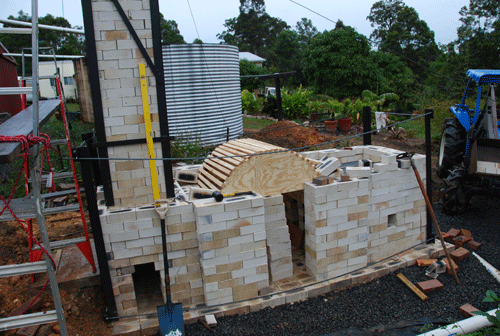
Here showing the wooden frame for the arch of the chamber and the steel around the whole structure in place.
 Dry run placing the bricks
Here is the start of laying the brick with refractery cement.
4 Jul 2010
Well it has been a while sinds my last post, less than a week to go to the party when it was suppose to be finished. The last week two days rain so well behind the eight ball. I am still trying to finish in time but problably not however we are still having a party. I am leaving on holiday the wednesday after.


Next Saterday the 10 Jul we having the kiln party this is still happening, Pizza, Wine and Beer.
The pizza oven will be fired in the early afternoon
Hope to see you all
Rudy & Muriel Meyer

 Kiln packed, notice the shelfs are to close together, one of the reasons why it was so hard to get the heat down below.

 Ready for the firing
 After the firing, notice we knocked the shelf over while side stoking, after that the bottom heated up ok, surprise no breakages!!!
 Improvement !!
 After the second firing in Mar.
 Next firing in May, some drama. Next time check what clay you put in the kiln :)
Only damaged two shelfs
 Some of the shino glazes from the firing in Dec 2011
 Feb 2012 - Mark stoking the fire


 Kiln picture as taken today 17 Apr 2012
20 Apr 2012,
Filled the kiln this morning, this week I made a door panel with an inspection hole see foto below.
I have lit the starting fire as you can see I start this out side fire box inspection hole and with the door not completed as yet we have excellent draft.


I am doing a bisque fire looking for about 950 to 1000 C.
The glaze fire to cone 9 / 10 is to be the first week of May.
Cost of building this kiln
Total cost would be approx between $A2000 and $A2500
Materials used
brick 2400, some I got from a friend
vermiculite, perlite, straw and clay for the coating some of the materials were already in my possession.
4 bag of castable mix, used for the roof of the fire box, base of the chimney, fire grit etc
fire blanket over the roof,
Steel for around the external bricks and chimney
Gravel for under and around the kiln
I think thats about all I can think about.
Apr 2012
Hi all, looks like we have some people following this blog much to my surprise.
So here is a follow up on all we have done with the kiln.
Our first fire was on the 19 Jan 2011, I was just wondering why it took so long before the first fire but looking back we spend a couple months traveling across the north of Australia, the couple of weeks in Adelaide, took the grand kids camping for a week and then Woodford folk festival that puts in Jan and at long last had a firing organized.
I will try to put all the pictures on completion of this blog.
Evening 18 Jan started a gas flame in the kiln (not very successful) only managed to get the temp up to 65C .
2.30 am started with a small fire below the main fire box, continued this until the temp reach 150C which was around 6 am.
After this I started the fire in the boury box and continued this until the cones were down this was about 11.30 Pm
Conclusion : the kiln performed well, but the operator lacked experience ( that was me )
Found much fluctuation of temp between the top and bottom of the kiln, Took about 3 firings to get the hang of that problem. I also have two termo couples in the kiln which is a great help to monitor the situation.
Now a days I also do a bisque fire in the wood kiln, I don't pay for the wood but I do for the gas.
Yes if I were to build the kiln again I would do some changes
- I made the door to small to the chamber and also the access to the bottom of the chimney.
- The nice fitting damper is a bit to tight, as the chimney moves during the firing and there was a time were I was unable to move the damper.
- I would have liked to have the chamber a little higher and a brick or so longer. ( I build it to the space I created and not according to the plans)
- I would like to re do the chimney, I am always worried about the movement. I have put a frame next to it to keep it in check.

Packing the kiln for the first time


Closing in the door


Only damaged two shelfs


A large planter pot out of the last firing in Feb.
As you can see that not one fire has been 100 % successful, but all have produced results we were happy with.
For me it is a hobby I do between going on holiday. Most of the things I made are for the garden. We are on 2.5 acres and my aim is to have all gardens and no grass, this years target is a water feature and pond.
Well this will do for now. Oh the next fire is first week in May, so if you like to join us drop me a line and get something ready to put in the kiln.
20 Apr 2012,
Filled the kiln this morning, this week I made a door panel with an inspection hole see foto below.
I have lit the starting fire as you can see I start this out side fire box inspection hole and with the door not completed as yet we have excellent draft.


I am doing a bisque fire looking for about 950 to 1000 C.
The glaze fire to cone 9 / 10 is to be the first week of May.
Cost of building this kiln
Total cost would be approx between $A2000 and $A2500
Materials used
brick 2400, some I got from a friend
vermiculite, perlite, straw and clay for the coating some of the materials were already in my possession.
4 bag of castable mix, used for the roof of the fire box, base of the chimney, fire grit etc
fire blanket over the roof,
- Most of the heat loss in a kiln is through the roof thats why I the extra insulation, it is well worth it as the roof remains cool on the outside while firing the only place where I can feel some heat above the fire box.
Steel for around the external bricks and chimney
Gravel for under and around the kiln
I think thats about all I can think about.
